Giving

Magic Potion Kit


dsc_0809

We’re hunkered down at home today thanks to the weather.  All derby practices and scrimmages have been called-off on account of the wind storms and flooding in Portland.   All my big garden projects for the afternoon are similarly on hold.  But we have found plenty to keep us busy in the hosue today.

Hal has a birthday party for a close friend from his ReWild Nature Immersion program, and I asked him what his friend might want for his birthday.  He replied, “Carmine’s really into Minecraft, and I think a magic potion kit would be a cool gift.  Let’s make it a ReWild-style kit, though, okay?”

dsc_0803Every magic potion kit needs something in which to grind the ingredients.  We started wtih a wooden mortar + pestle set I found online.  We polished it with some of our Beeswax Polish, and set about finding potion ingredients that could be ground in it.

dsc_0797

George helped pack dried flowers (calendula, lavender) and herbs in babyfood jars (I had picked up a bunch on Freecycle for the kids’ craft projects).

dsc_0794I added sweet myrrh resin (Opoponax, from Somalia), which smells amazing and is fun to grind up.

dsc_0800I lined a thrifted wooden box with some gardeny-herby fabric cut to fit, then Hal helped arrange the jars of herbs and flowers and magical-doo-dads and dropper bottles and wrap it all up.

dsc_0808


dsc_0805

I know Hal was really proud of his homemade gift and I hope Carmine likes the finished kit and he gets a chance to create all sorts of messy magical projects and potions!

End of Summer Salad

dsc_0597

A friend from derby is recovering from a broken leg and I’m taking her tomato bisque and homemade bread for dinner and needed a salad for the side dish. The garden is bursting with tomatoes and peppers, the mint has spread everywhere, and the fall curly kale is ready to start harvesting.  I have a big block of feta in my fridge and a lot of Israeli couscous in my pantry.  And thus, this salad came together.

(Note: The recipe serves four, but some of the quantities look large in the photos because I made a quadruple batch to share with my parents and so our family could have some for dinner, too.)

End of Summer Israeli Couscous Salad

Serves four

2 cups Israeli couscous (sometimes sold as “pearl couscous”)

2 1/2 C water

2 tsp salt (I prefer pink Himalayan)

1 1/2 Tbsp extra virgin olive oil

2 C chopped tomatoes (I used a mix of cherry and beefsteak tomatoes)

1/2 C finely chopped sweet peppers (I used pimiento and part of a yellow bell pepper)

1/4 sweet onion, very finely chopped

2 large pieces curly Scotch kale, washed, ribs removed, and chopped

2 tsp fresh mint, cut in a fine chiffonade

2 tsp red wine vinegar

1/8 tsp cracked black pepper

6 ounces feta, crumbled

Directions:

  1.  In a medium saucepan, bring the water and salt to a boil.  Add the couscous, cover and cook for 8-10 minutes or until couscous is tender and cooked through.  Remove from heat, remove lid, toss gently with the olive oil, and allow to cool to room temperature.

dsc_0592

2.  In a large bowl, combine all chopped veggies, mint, pepper, vinegar, and feta and gently toss.

3.  Gently fold the cooled couscous into the bowl of veggies. Add salt and additional pepper to taste.  Garnish with sprigs of mint, and serve at room temperature or chilled – your choice. Enjoy!

dsc_0602


Little Tomte, Wooly Squirrel

IMG_0546

Astrid Lindgren’s The Tomten and The Tomten and the Fox are two of our most-cherished winter-time books.  I adored them as a child, and am very glad my kids love them, too.

A few years ago, Ruth made a needle-felted fox and little Tomten, and the boys still look forward to playing with them while I read the stories.  IMG_0548

The Tomten cares for the creatures of the forest and keeps watch over the animals of the farm.  He is a gentle, quiet little gnome and these simple stories of his unseen interactions on the farm resonate with young children.

My children have enjoyed their little Tomten and Fox playset so much, we have begun a tradition of felting little Tomte as Christmas gifts for friends with young children.

IMG_0551

I set out everything to begin making a few, when Ruth decided to put the materials to better use:  crafting another friend for her own Tomten:

IMG_0553

IMG_0557She wants to make it clear that he isn’t completed yet, but her little squirrel is beginning to take shape.  He still needs color and detail, but when finished, he will make a nice little addition to the Tomten play set.  Perhaps we can make a few more forest friends to join him, but for now, it is back to crafting a few more Tomten men.

Joining the KCCO today.  Back tomorrow with some knitting and books.


Needle-Felting Kit

IMG_0520

The girls wanted to share about a recent birthday gift they made for a friend: a simple needle-felting kit.

My kids – like many kids – really enjoy playing and crafting with bit of wool and yarn.  Ruth, in particular, has enjoyed needle felting ornaments and little animals for her siblings for quite a long time.  Ruth wanted to make a gift for her friend -who is also quite artistic – and Ruth thought she might enjoy making little wooly creations, too.

IMG_0522

First, we found a basket at the thrift store that met with everyone’s approval.  Then, the girls cut a block of foam from our stash of dense craft foam.  We added a needle-felting needle (Needle-felting safety rule #1:  Always store the needles in their block of foam!)

IMG_0521A visit to the Pendleton Woolen Mill Store provided the necessary collection of bright wool for decorating, while I included some balls of white and natural grey/brown spinning fiber to be used as the base over which the bright colored wool will be felted.

Very proud of my girls and their creative gift ideas.  I’m looking forward to seeing what they have made for each other and their brothers for Christmas.

If you have Handmade Holiday projects to share, please post a link in the comments – I would love to read about what you are working on!


Midwinter Sunshine

1712


Off the needles:   A simple pair of mitts for a gift exchange, to which I added a little needle-felted embellishment.

IMG_9072

Ruth painted a cheery sun on the card and we sewed a drawstring gift bag to round out the gift, and packaged it up.   It was sent it on its way across the country, where it will bring a fellow Grinnellian some Christmas cheer.

IMG_9066

IMG_9087

To bring our own family a bit of sunshine in midwinter, a batch of sunny bright marmalade was in order.  I was planning on plain old orange, but when I managed to get my hands on a bowl full of calamondins this week, I knew they were destined for marmalade perfection.  Calamondins are petite, seedy and extremely sour citrus.  However, jam connoisseurs (like Bea, who absolutely relishes marmalade) consider marmalade made with these little oranges to be the finest around.

Calamondins have a slightly smoky, musky – almost black currant – undertone that lends a subtle complexity to the finished jam.  The peel melts in as it cooks, providing texture and flavor, without any detracting chunkiness or bitterness.  If you are lucky enough to be able to source calamondins, the flavor is well worth the extra effort of seeding and slicing dozens of miniature oranges.  If not, you can substitute satsuma tangerines for sweeter finished product, or Meyer lemons for an extra tart marmalade.  Here is my recipe:

IMG_9094

Calamondin Marmalade for Bea

Calamondins (see substitutions above), halved, seeded, and sliced paper thin, to equal 3 cups of pulp + peel (about 40 fruits)

2 1/4 cups water (or 3/4 cup water for every cup of citrus pulp)

White sugar

Directions:

-In a medium heavy-bottomed sauce pan, combine pulp and water.  On medium heat, bring to a boil, and simmer for 15 minutes.  Remove from heat and allow to cool.  (You can do this the night before and refrigerate it.)

-Prep all your canning equipment.  Bring hot water bath canner full of water up to a boil.  Sterilize jars, heat lids and rings.

-Measure pulp.  It should equal 4 cups (give or take).  In a large heavy-bottomed pot, combine sugar and pulp in a 1:1 ratio (add 1 cup of white sugar for every cup of pulp).  Bring to a boil, and cook until jelly point (22oF) is reached.  (Alternately, you use the spoon method to determine when the jam is finished.).

-Citrus is high in pectin, so be careful not to overcook, or you will have unpleasant sheets of rubbery pectin in the finished product.  Remove jam from the heat, and stir once a minute for four minutes (this distributes the peel, so it does not all float to the top of each jar).  After four to five minutes, the jam can be jarred up.

-Pour marmalade into hot sterilized jars, add lids and secure rings.  Process 1/2 pints in a hot water bath canner for five minutes.

And to bring a little cheer to your midwinter as we turn back to the sun, a few lines from one of our favorite books of poetry - A Visit To William Blake’s Inn by Nancy Willard – and its delightful Marmalade Man:

The man in the marmalade hat
bustled through all the rooms,
and calling for dusters and brooms
he trundled the guests from their beds,
badgers and hedgehogs and moles.
Winter is over, my loves, he said.
Come away from your hollows and holes.


‘Tis the Season

1702


Merry Christmas!  I’m trying to post a bit for the holidays, as time permits.  We will see if I can keep it up.  My laptop is still broken, so I am borrowing my husband’s late at night after the kids are in bed.   The girls and I spend much of our spare time with speed skating club and the girls’ roller derby (I’m joining the recreational league in January!).  Hal is learning to read and endlessly creating Lego sculptures, and George is full of joy and wonder and 2 yr-old energy.  We are making all sorts of changes in the back yard gardens when the weather permits.  Life is busy and good and we are enjoying slowing down a bit for the holidays.

The last week or so, we have been trying to finish up Christmas presents and school projects.  I was a bit late in potting-up the paperwhites, but hope they will bloom in time for New Year’s Day.  One for us in a newly-found blue dish from the thrift store, and two for gifts.

IMG_9056

IMG_9054

I had a little helper bundle up to help me in the chill and sunshine:

1669

1670

1667

1668

Be back very soon with some requested recipes and more of our Advent season.

Blessings.


Forest Quilts

DSCF4386

A friend from the coast and my next-door neighbor are both expecting, and we wanted to make them both something special.  The girls and I shopped the remnant section at Fabric Depot, as well as the fabric shelves at our local thrift store, and put together two forest-themed baby quilts.

DSCF4394

This one is a Rain Forest theme for the next-door neighbor.  We used thrifted flannel sheets (triple layered) for the batting and a thrifted cotton sheet for the backing fabric (thrifted sheets = my favorite frugal quilt backing).

DSCF4384

This was the first time in years I’ve made a separate bias binding instead of doing a self-binding backing.  What a pain it was!!  I forgot how long it takes to make, and iron and while the effect was nice, I won’t use it on my next few quilts…

DSCF4395

The next quilt is for a friend who is an amateur mycologist – it’s a Forest Floor quilt, complete with mushroom and tree-ring prints.

DSCF4353

DSCF4355
The quilt is just a simple four-patch with some mustard-colored Egyptian-print thrifted fabric for the back and binding.  Bea helped me lay out the pattern and cut some of the blocks, Ruth helped sew about half of the 4-patch blocks, and sewed the borders on.

Now, to find a time to drag 4 kiddos to stand in line at the Post Office so we can send it out….

I have come to realize that there is absolutely no way for me to maintain a clean house, work on learning projects with the kids, get the yard/poultry chores done, cook meals, care for an infant, and accomplish any serious crafting.  It’s just not possible to keep up with it all, no matter how it may appear from the limited perspective of crafty-homeschool-mom blogs.  For the moment, the unfolded laundry is piling up, the living room is home to dust bunnies and crumbs galore and the toy basket looks like it exploded all over the front rooms, but that’s okay, because we had a great time working together to bless our friends in a small way.

DSCF3967

And, now to have a “cleaning and catch-up day” before we start all over with a new quilt for another friend expecting an addition to her family…

Beads and wire, and a little mania

IMG_8351

Little Hen and I have been very busy the past two days working on Christmas gifts.  It may have, um, gotten a little out of hand.

IMG_8352

IMG_8360

After a little mishap in which a certain little boy decided it would be hilarious to fling beads all over the living room while I was in the basement switching the laundry over, we have been beading until our fingers blistered (no joke!).

IMG_8353

If you’re a female relative, you just might be getting some earrings for Christmas.   We also made some pendants and beaded bookmarks for those without pierced ears.  (Shh.  Forget I said that.)   🙂

So, the first wave of intense Christmas present-making is done!  And now to work on some edible treats (We’re thinking of tackling hot cocoa mix and homemade marshmallows tomorrow.)

“It’s a Girl Thing” Kits

IMG_8240

IMG_8242

The kits are finished!!

IMG_8241

IMG_8244

Many, many thanks to the nine ladies and three girls who helped sew, and the ladies who purchased fabric and undies for this project!

Together, we have blessed and changed the lives of eleven young ladies in Ethiopia in a simple, but substantial way.  Thank you!

Sewing Service – “It’s a Girl Thing”

IMG_8160

I’ve been given permission to put up a section of a recent post from Andrea’s blog, Babe of My Heart:

Every month, I have to deal with what most girls deal with…a monthly cycle. Sorry if that’s too personal to say–but it should come as no surprise to you. I take for granted that every month I stock up on the things I need…and I can get them in any size, weight and style I would like. And not only that–I complain about my cramps. I complain that I am a bit inconvenienced and I remind my husband that he is lucky to be a boy and he doesn’t have to endure such hardship each month.

SO…let me ask you this—what do you think the women and young girls of Korah do during this time? What will it be like for the hundreds of girls who are (praise GOD!) being sponsored to leave Korah this Fall and go to a boarding school? What will they do as they try to sit in class during this time? What do the woman and girls we support in Zambia do?

EVER THOUGHT ABOUT THIS?

Well, let me tell you what they do. They squat. They wait for their week to end. On their heavy days, some roll up newspapers and make their own tampons. Many get infections. The infections make their parents and husbands think they have STDs and they endure being left or abused. Some use a single piece of old clothing–and when it’s soiled–they rinse it and use it again…although it’s still wet—it’s some what clean.

Did you know that in Africa the dropout rate for for young girls in school is 40% when they have no sanitary supplies? BUT when they are provided them–it rises to just 8%?

What can we do about it?

IMG_8164

Andrea, and also  Sarah at Titus Home, have put out a call, and given us a practical way to help these girls – they are encouraging ladies around the country to have sewing parties and make washable feminine products to be sent to these girls and young women in Ethiopia and Zambia.

So, if you’d like to take up the challenge, and spend a few hours in service to these young women (and make a concrete difference in their lives!), I’d like to invite you to join me

on September 25 · 9:00am – 12:00pm

at Central Bible Church

8815 NE Glisan St

Portland, OR
for a morning of sewing, to put together as many washable feminine kits as we can, to be sent to these young women October 1.

WHAT TO BRING: your sewing machines, sergers, cutting mats, scissors, rotary cutters, thread, old towels or flannel sheets (for batting). Any spare velcro, snap closures you might have.

WHAT IS PROVIDED: patterns, ALL FABRIC, a few extra sewing machines and sergers. Coffee, snacks and CHILDCARE.

IMG_8162

Last night, I made a sample kit today using the pattern supplied by The Red Tent Project.  The kit consists of 5-6 envelopes, each with snap closures, and half with leakproof PUL, for heavy days (see above).  It also includes 4 thick, “maxi” pads (see below), which unfold for easier drying on the line,  and 8 regular pads (see 2nd picture in this post),  which can be doubled up if needed.

If you are interested in making kits, but are unable to attend on the 25th, please e-mail me at angela.baker.knits@gmail.com, and I will send you the pattern and instruction details, as well as shipping addresses.  Or, if you prefer, select a pattern you like from the internet.  They are requesting that you use bright or dark print fabric, and prefer foldable inserts, since thicker pads and AIO designs do not dry well on the line.

IMG_8165

To round out the kits, we are sewing a drawstring bag for all of the pieces, and attempting to collect 2-3 pair of new undies to include, as well.  If you might like to contribute to the project by donating funds for new undies, please contact me at the above e-mail address.  Thanks!

IMG_8159

Wednesday Harvest

IMG_7790

A few things from this morning’s harvest.  Carrots, beets, 3 types of kale, lots and lots of chard, and buckets full of sugar snap and snow peas.

IMG_7788

So grateful for the constant stream of Teaching Garden volunteers today.  Folks were working hard from 9:30 am straight through to 4:30pm.    We’re feeling very, very blessed.   A big thank you to all of the helping hands!

Last-minute handmade gifts

IMG_6845

The weather here has been  bitterly, bitterly cold (we are eagerly anticipating our annual Christmas trip to Florida next weekend!!).  The past few days, we’ve built a big fort out of chairs and blankets in the living room.  We’ve been spending our mornings snuggled under it, reading Christmas stories (like this collection of short stories, and this, and this).

While Tum Tum naps in the afternoon, the girls and I have been finishing some last-minute Christmas gift sewing.   The children’s’ Great Aunt gave us some lovely blue toile, and I picked up some other fabric at the thrift store (including a sturdy pale-blue canvas with ferns).  We set out to make a few more farmer’s market totes/library totes for family and friends.

IMG_6848

Firecracker held and worked the pedal, and Little Hen and I guided it through the machine.  Little Hen trimmed the threads and helped cut fabric.  In two afternoons, we were able to churn out five large totes, and one child-sized one.

IMG_6846

All of the totes are lined with contrast fabric and have reinforced, deep-set handles.   A few have lined pockets, since I had a bit of fabric leftover.

IMG_6853

IMG_6854

The child-sized tote was cut from 3/4 yd late 1940’s/early 50’s (?) sombrero fabric we found at the thrift store – the colors were so vibrant!  And for 75 cents, how could I pass it up, even with a few age spots?  I had originally planned to give it to one of my nieces, full of craft supplies (colored pencils, watercolors, brushes, etc), but Tum Tum adopted it this morning, putting Nativity figures in it and carrying them around the living room, so we’ll see if it actually leaves the house…

No time to make handmade gifts for Christmas?  Consider buying handmade – here are some beautiful totes  on Etsy – a burlap coffee bag tote, a floral bag,  a tie-dyed tote, and this bright oilcloth bag.

Now to clean up the clouds of fabric and thread snippets all over our living room!

Christmas Paper-Craft Kit

IMG_6829

The girls are reaching an age where they really enjoy being able to participate in making Christmas gifts.  So, for their cousins (ages 5 1/2 and 3 1/2), we put together little paper-crafting kits, so Aasha and Ruby can enjoy an afternoon of Christmas crafting.

This is a very frugal gift, costing us less than $1 per kit, since we used cardstock scraps and last year’s Christmas cards, as well as craft notions purchased at the thrift store.  It’s also a gift crafty kids will love – when I made my girls fall-themed kits for Thanksgiving day, they made cards, collages, and all sorts of really inventive little creations.

If your kids would like to make these thrifty gifts for their young friends and family, they will need:

IMG_6798

Scissors and pinking shears

a hole punch

paper punches (we used cardinal and snowflake punches, which I pick up when they are deeply discounted after the season)

Christmas-print cardstock scraps (we found some 60% off right after Thanksgiving (with a coupon)  for another project and I saved the scraps) or old Christmas cards to cut up

blank cardstock (we used reds and whites approx 3″x5″ from our economical big box of trimmings and discards from a stationer’s)

small cellophane bags (thrifted), and one larger cellophane or paper bag

crafting notions, such as ric-rac, sequins, stickers, buttons, glitter, seam-binding (anything crafty you can pick up at the thrift store)

glue sticks and glitter glue

IMG_6828

Directions:

1.  Use the pinking shears and scissors to cut out small pieces of cardstock and old Christmas cards – various sizes (2″x3″ up to 3″x5″).

IMG_6818

2.  Puch out snowflakes and birds (this is Little Hen’s favorite part), and sort them into the small cellophane bags. (Firecracker spent a very long time glueing the glittery wings on all of the little cardinals and getting them at just the right angle.)  Punch holes and tie with thrifted ribbon or ric-rac.

IMG_6827

3.  Fill additional small bags with craft notions and other small cut-outs from Christmas cards, and again whole-punch and tie these closed.

IMG_6817

4.  Neatly fill the large cellophane or paper bag with the card stock, and add the bags of punches and notions in the front.  Throw in a glue stick and a tube of glitter glue.

IMG_6831

IMG_6835

5.  Create a pretty label for the front from additional cardstock, and decorate with glitter glue.  Whole-punch, and run a ribbon through the label and the bag to attach and close.

6.  Give the gift of open-ended Christmas crafting fun!

Pieces of our Saturday

IMG_6703

A morning spent baking a pecan pie thank-you.

IMG_6713

IMG_6717

IMG_6725

An early afternoon spent planting hyacinths and digging earthworms with the girls.

IMG_6728

IMG_6729

IMG_6731

A late afternoon of immense blessing – We have been given an enormous maple loom, made right here in Oregon.   We spent about two hours getting it dissassembled, carried up our narrow stairway, and reassembled.

It will need a good bath, a shuttle, some new pegs, but it is a beautiful, beautiful thing – an amazingly generous and precious gift.  The girls and I can’t wait to get her in working order and teach ourselves how to weave shawls and rugs and coverlets – our minds are full of anticipation and possibilities!  (Firecracker would like a superhero cape!)

And now we are off to our homeschool co-op’s end of the semester Open House.   We have been looking forward to it for weeks (Little Hen is in the theatre class, and Firecracker will be singing in the choir).   We’re so glad Grandma and Aunties and Cousin can come down and join us.

Altogether, a truly blessed Saturday – every piece.

Princess and the Pea

img_6432

We’re back in our old stomping ground – on the Central Oregon Coast – this weekend.  Some dear friends are having a cider pressing party, and we wouldn’t miss it for the world.  The weekend trip is also a gift to my dear husband, who celebrates his birthday today!  So, we’re staying in a yurt on Beverly Beach and I have promised the girls roasted marshmallows over the campfire.  (I hope to write a bit about our trip when we return home.)

We wanted to bring a little something for our friends who are hosting the party – she was the girls’ preschool teacher, with an amazing gift for connecting and communicating with young people – I learned SO much about relating to my own kids from watching her and feel very grateful the girls could have her for their preschool teacher and friend.   So, we decided to make something for her classroom -  a Princess and the Pea playset.

img_6438

We used Soule Mama’s playset (and also Tree Fall Design’s) as a launching point, but used a fall color scheme and scaled it down, so little hands could hold the pieces more easily.   I also added a lined drawstring bag in which to store the set.

img_6370

The girls and I selected fall colored fabrics from my fat-quarters stash, and whipped up some mattresses, a blanket and pillow.

img_6440

We originally thought of making a paper doll, but the girls and I decided to make a cloth doll instead, since we had the fabric and the time.  Now, I am absolutely not a skilled doll maker, so she’s a little rough, but Little Hen helped pick out the fabrics from the scrap bag, and helped me fashion her hair out of some merino roving, and I’m pretty pleased with the results.

She’s all cotton, except for the hair, her vest, and the stuffing, which are all wool – oh, and a little bit of velvet trim on her skirt.

img_6433

The pea, made of felted roving.

img_6435

img_6439

The princess gets tucked in, but oh, she can’t get any rest – she tosses and turns all night! That pesky pea!

img_6437

The girls and I had SO much fun making this set, and I hope to make one for Firecracker (whose favorite fairy tale is this one) as a Christmas gift.   It was joy to make something for Teacher Linda – we have been so blessed to know her, and definitely stitched our love and gratitude into every piece of this play set.

I hope you have a perfect autumn weekend – I know we’ll be pressing cider in the coastal drizzle and enjoying the company of truly exceptional folks  – definitely a perfect autumn weekend if you ask me!

Hot Cocoa Mix

img_6201

Today Firecracker and I are attending our church’s fall kickoff of our monthly Ladies’ Breakfast.  The pastor’s wife is hosting at her house, so we thought we’d take her (and her daughter – Firecracker’s friend) a little hostess gift when we go.

img_6199

Earlier this week, we went to to the thrift store and picked up a little basket, lined it with an embroidered linen hand towel (from my stash).  We also found two little silver spoons, and paired them with two vintage Japanese tea cups and saucers.  The tea cups had a glossy opalescence that Firecracker really liked  (“the inside of the cup looks like a soap bubble!”).  To round out the Mom and Daughter Afternoon Cocoa basket, we made a batch of Not-Too-Sweet Hot Cocoa Mix.

If you’d like to make some cocoa mix of your own (which I prefer to store-bought, because it isn’t overwhelmingly sugary), prepare to get messy!  You’ll need –

img_6167

Sift together 2 cups powdered sugar and 1 cup dutch-process cocoa and 2 tsp cornstarch (no lumps!).

img_6160

Then stir in 1 tsp salt and 2 1/2 cups powdered milk,

img_6174

and finally, add a large pinch Ancho Chili Powder.  (The original recipe is from Alton Brown’s website (love Good Eats!), although, the first time I made it, the girls didn’t like the cayenne, so now I use the Ancho chili powder, which is very mild, but provides a hint of smoky pepper flavor.)

img_6177

Stir all ingredients together, and store in a large jar, sealed tight.  To make up a cup, fill your cup 1/3-1/2 full with the mix.  Add hot water, milk or coffee to fill.  Enjoy!

Hope your weekend is filled with peace and good fellowship.

Retro Fall Doll Quilt

img_6071

img_6073

Little Hen and I finished the  first scrap doll quilt in a while with more of a fall color scheme.  We made it for a friend who’s daughter has a birthday coming up.

img_6040

Actually, there wasn’t much to it -the four main blocks were in the middle of a big bag of  fabric scraps I had been given.  Little Hen picked out the orange fabric “because orange is a good fall color” (from the same bag of scraps).

img_6072

In the scrap bag was also some neutral-yellow cotton fabric in a large enough piece to fold triple thick to serve as batting and backing for the quilt.   We layered them up and quickly put the doll quilt together.  The finished quilt is about 18″ x 24″.  Can’t wait to see our little friend snuggling her dollies up in it soon!

Passing down

img_6111

A day of sorting clothes for the change of seasons found lots and lots of dresses that are too small and will be passed down to a friend’s little girl.   Some were handmade for my girls, and It was bittersweet to see how much they had outgrown and to realize how quickly they’re growing up.  Seemed a very short while ago that these dresses were Little Hen’s, and then Firecracker’s, and now they’ll be another little girl’s.

img_6113

The girls reminisced for a bit (“Remember when I wore this dress to so-and-so’s birthday party?”, “Remember when you wore this outfit to the beach and we caught that crab?”, “Remember when Auntie Jen got me this dress?”), which seriously made me misty-eyed, and then we packed them up.

Glad to be able to bless someone else with them, but I wish my girls would stop growing up so fast!!

Totes

img_6085

img_6087

Now, my sewing skills are pretty basic, (nothing like the beautiful sewing at Pleasantview Schoolhouse), but this week I tried my hand at making some farmer’s market totes. (A few more tote tutorials can also be found here, but I like how the pattern I used has the lining fabric peeking up above the edge of the bag).

The first tote is made out of some vintage (1950’s?) fabric from the thrift store, with plain muslin lining and blue contrast stitching.  For the pocket on the front, I used a little heart I had been holding on to since I hand-quilted it at Girl Scout craft camp two decades ago.

img_6089

img_6088

The other two totes are made from old sheets (two thrifted, and one Little Prince toddler-bed sheet with worn out elastic. ).  They are very soft, and I like the blue-on-blue in both.  The girls have already claimed the Little Prince one as a sleep-over bag for visits to Grandma’s or Auntie’s.

img_6079

I also had enough fabric leftover from a quilt I made the other day to make a little (10″ x 12″) out of the scraps.

img_6080

The outside material is from a skirt I cut up, and the inside and pocket are made out of the same sheet material that lines the other two blue totes.

img_6092

I think making totes is pretty addictive, and several folks will be receiving some for Christmas (yay for the Handmade Pledge!!).  The girls picked out fabric for their own totes at the Knittn’ Kitten, and I also have fabric for two more large farmer’s market-sized cut up and waiting to be sewn together.   Hopefully, I’ll get to sew them up when the baby is napping later today.

Wishing you a thrifty, productive week!

Marionberry Liqueur

img_6004

We like to make an assortment of flavored liqueurs to enjoy on cold winter evenings (and to give as gifts).  The list includes apricot or peach brandy, lemoncello, elderflower cordial, raspberry cordial (alcoholic, and non-), and cherry brandy (which makes a very special soaked-fruitcake at Christmas).

I started making apricot vodka about 15 years ago (back in high school!) for my grandfather, but my current method was inspired by an article I saw 4 or 5 years ago in Backwoods Home Magazine (our library used to carry it – it’s a very…interesting magazine full of back-to-the-land and survivalist- type articles).

img_6002

This year, I added Marionberry Liqueur to the list, since the farmer’s market had some really beautiful looking marionberries.  The process would work for most any fruit – I make cherry and peach brandy in a similar manner.

Here’s my recipe  – which takes 5 weeks, but involves little effort-

Larksong’s Marionberry Liqueur

5 quart mason jars, lids and rims, washed with very hot soapy water, and sterilized (in dishwasher or boiled for 15 min.)

2 cups well-crushed berries (3-4 cups whole, measurement doesn’t have to be exact – if using stone fruit, wash and pit, but do not skin)

1 bottle inexpensive brandy or vodka (I personally like brandy for cherries, peaches, marionberries, and vodka for raspberries, citrus, apricots, pears)

white or brown sugar (I prefer brown sugar for peach brandy)

Directions –

img_6008

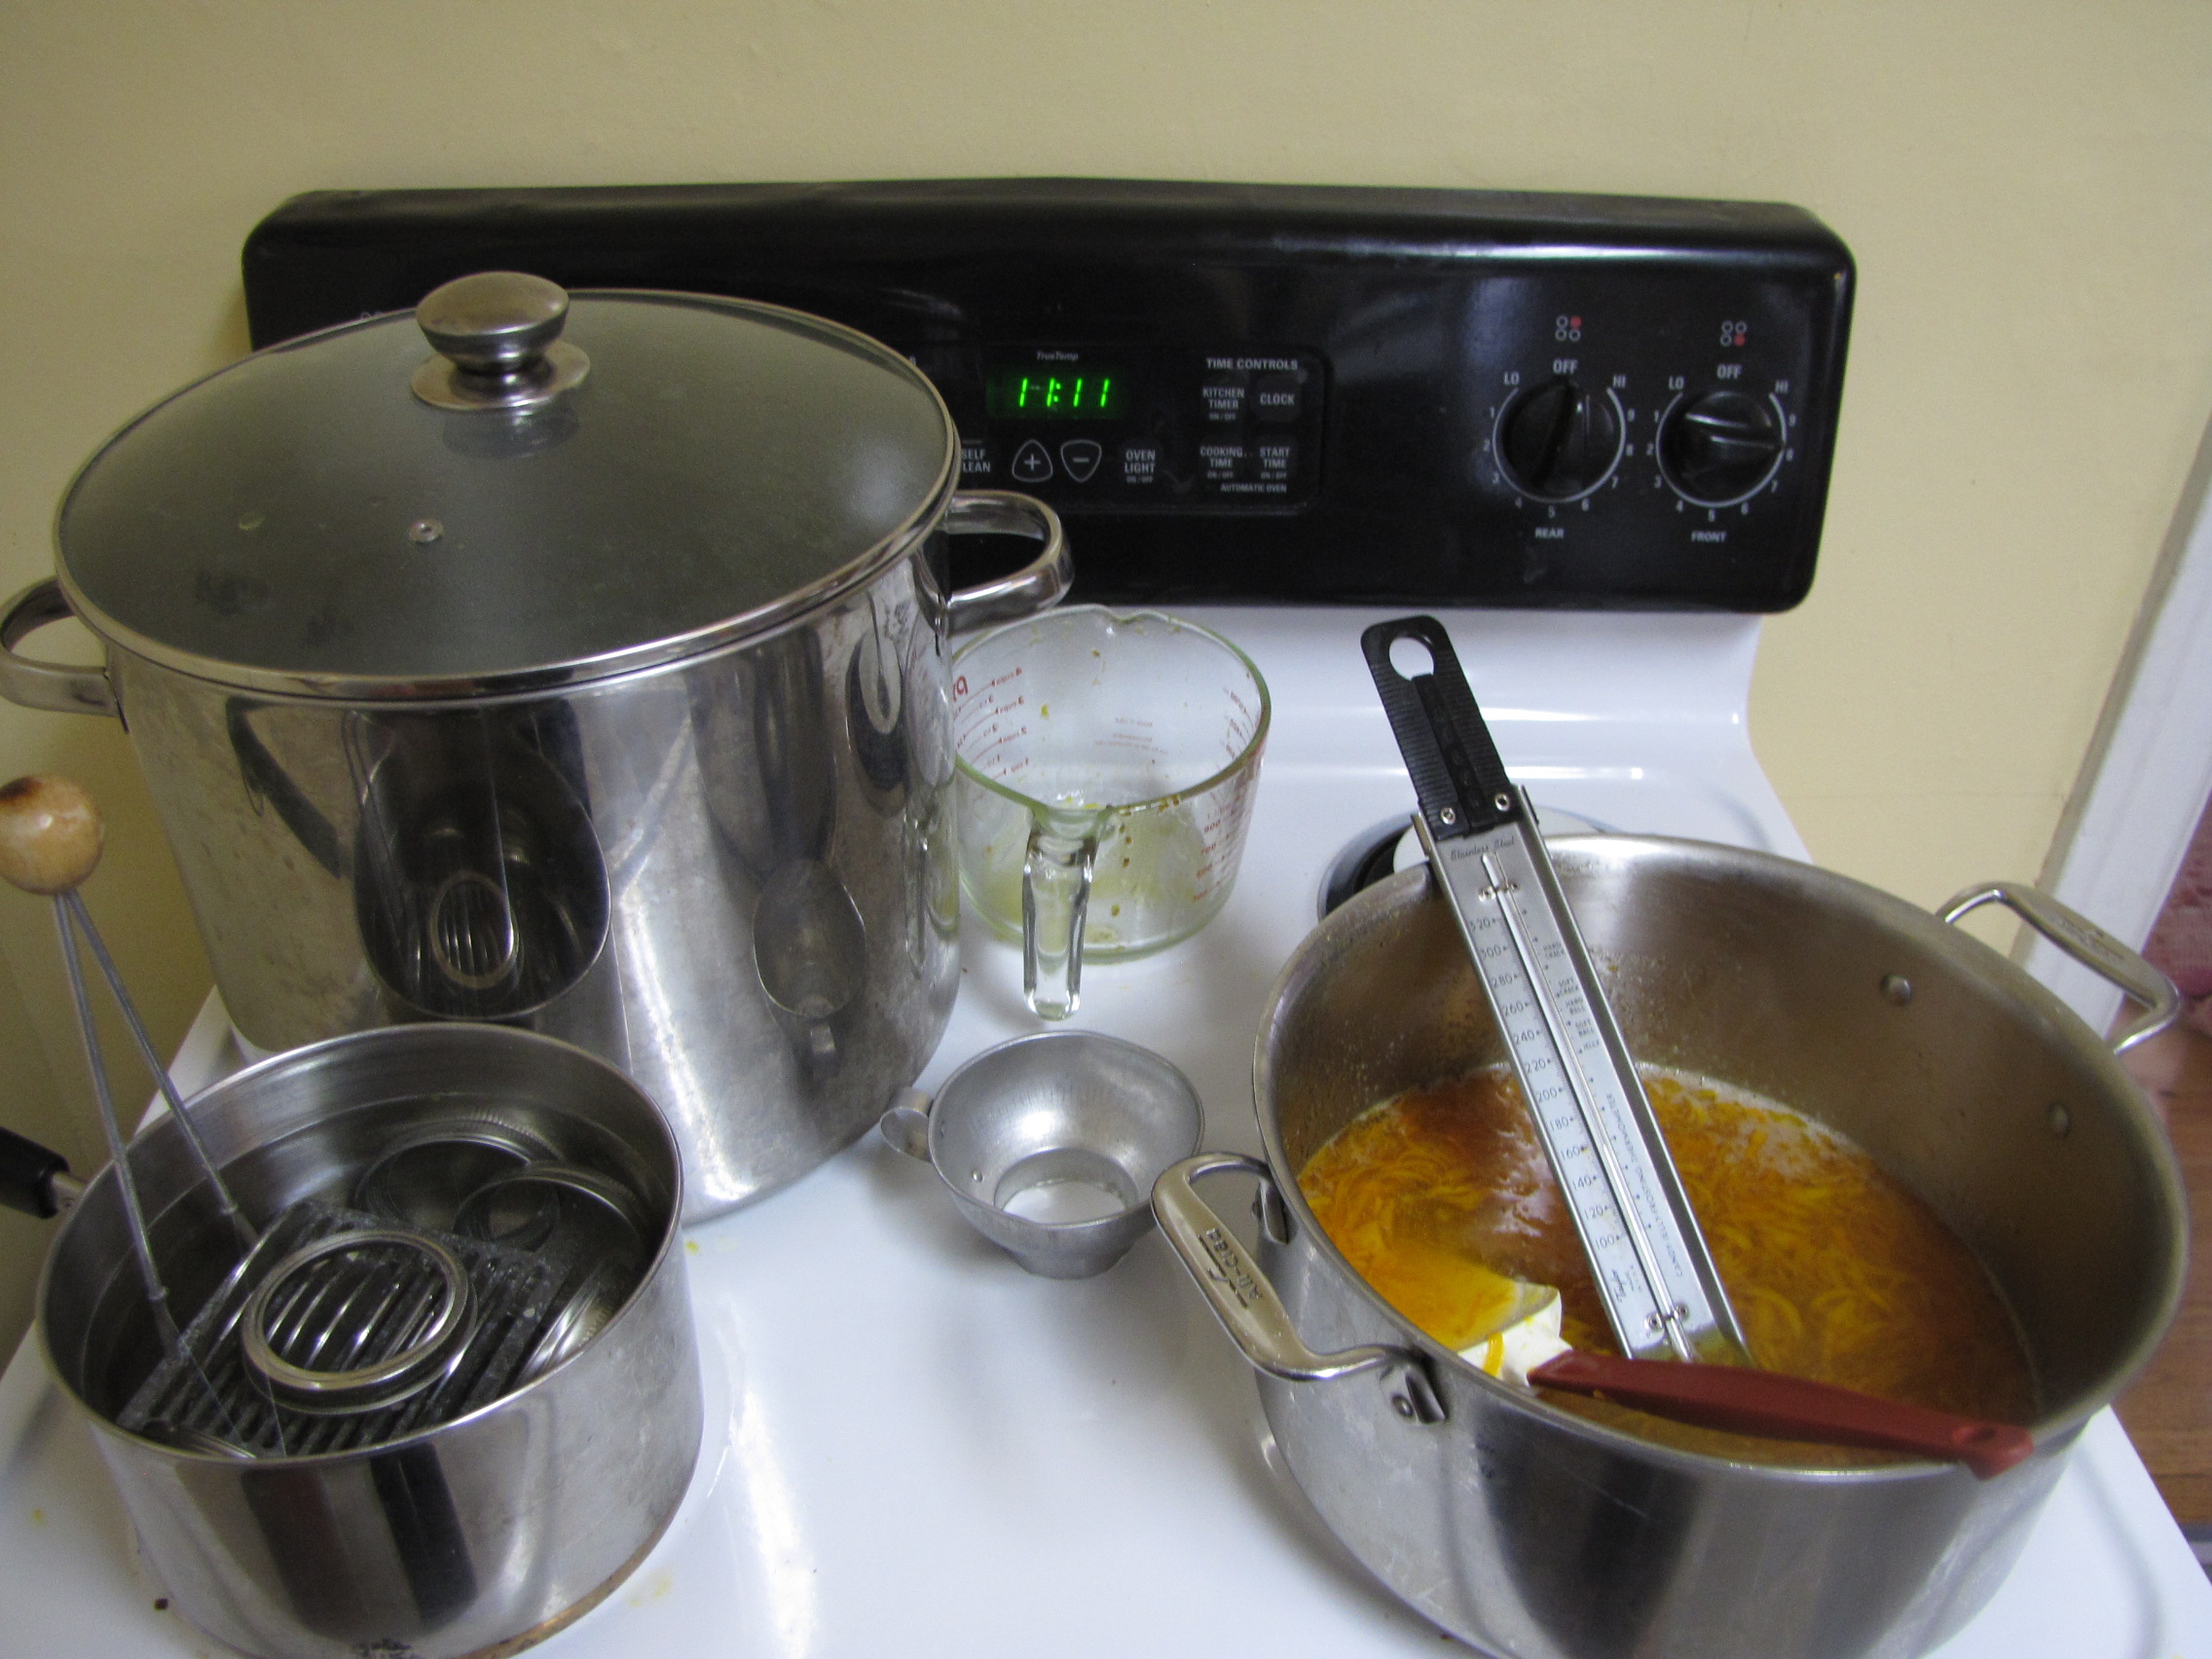
Week 1 – To one mason jar, add crushed fruit and 3 cups of alcohol.  Put lid and screw band on and invert several times.  Then, leave in a dark place (like a kitchen cupboard).  After a week, the alcohol will take on the beautiful color and much of the flavor of the fruit.

Week 2- Decant the alcohol carefully into the 2nd jar, close it, label this jar #1 and  set aside.   Sprinkle the berries that remain in the first jar with about 1/2 cup sugar.  Put the lid and screw band on, and invert several times.  Put both containers back in the dark for 1 week.  (The sugar will draw excess alcohol out of the fruit, along with LOTS of fruit flavor.)

img_6009

Week 3 – Decant the alcohol from the berries again (you will have between 1/2 and 3/4 cup – see middle jar above), this time, label the jar #2, and set aside.  Once again, sprinkle the berries that remain with sugar (just enough to coat the fruit this time).  Put the jars up for another week.

Week 4 – Repeat the process of week 3.

Week 5 – Carefully decant the last bit of liquid (don’t pitch the fruit! – the remaining fruit is wonderful over ice cream, or can be used in a loaf of quick bread.  If you used peach slices or apricot halves, they can be packed in jars with half a vanilla bean or a cinnamon stick, covered with simple syrup, and kept in the fridge until later – serve with a slice of poundcake).

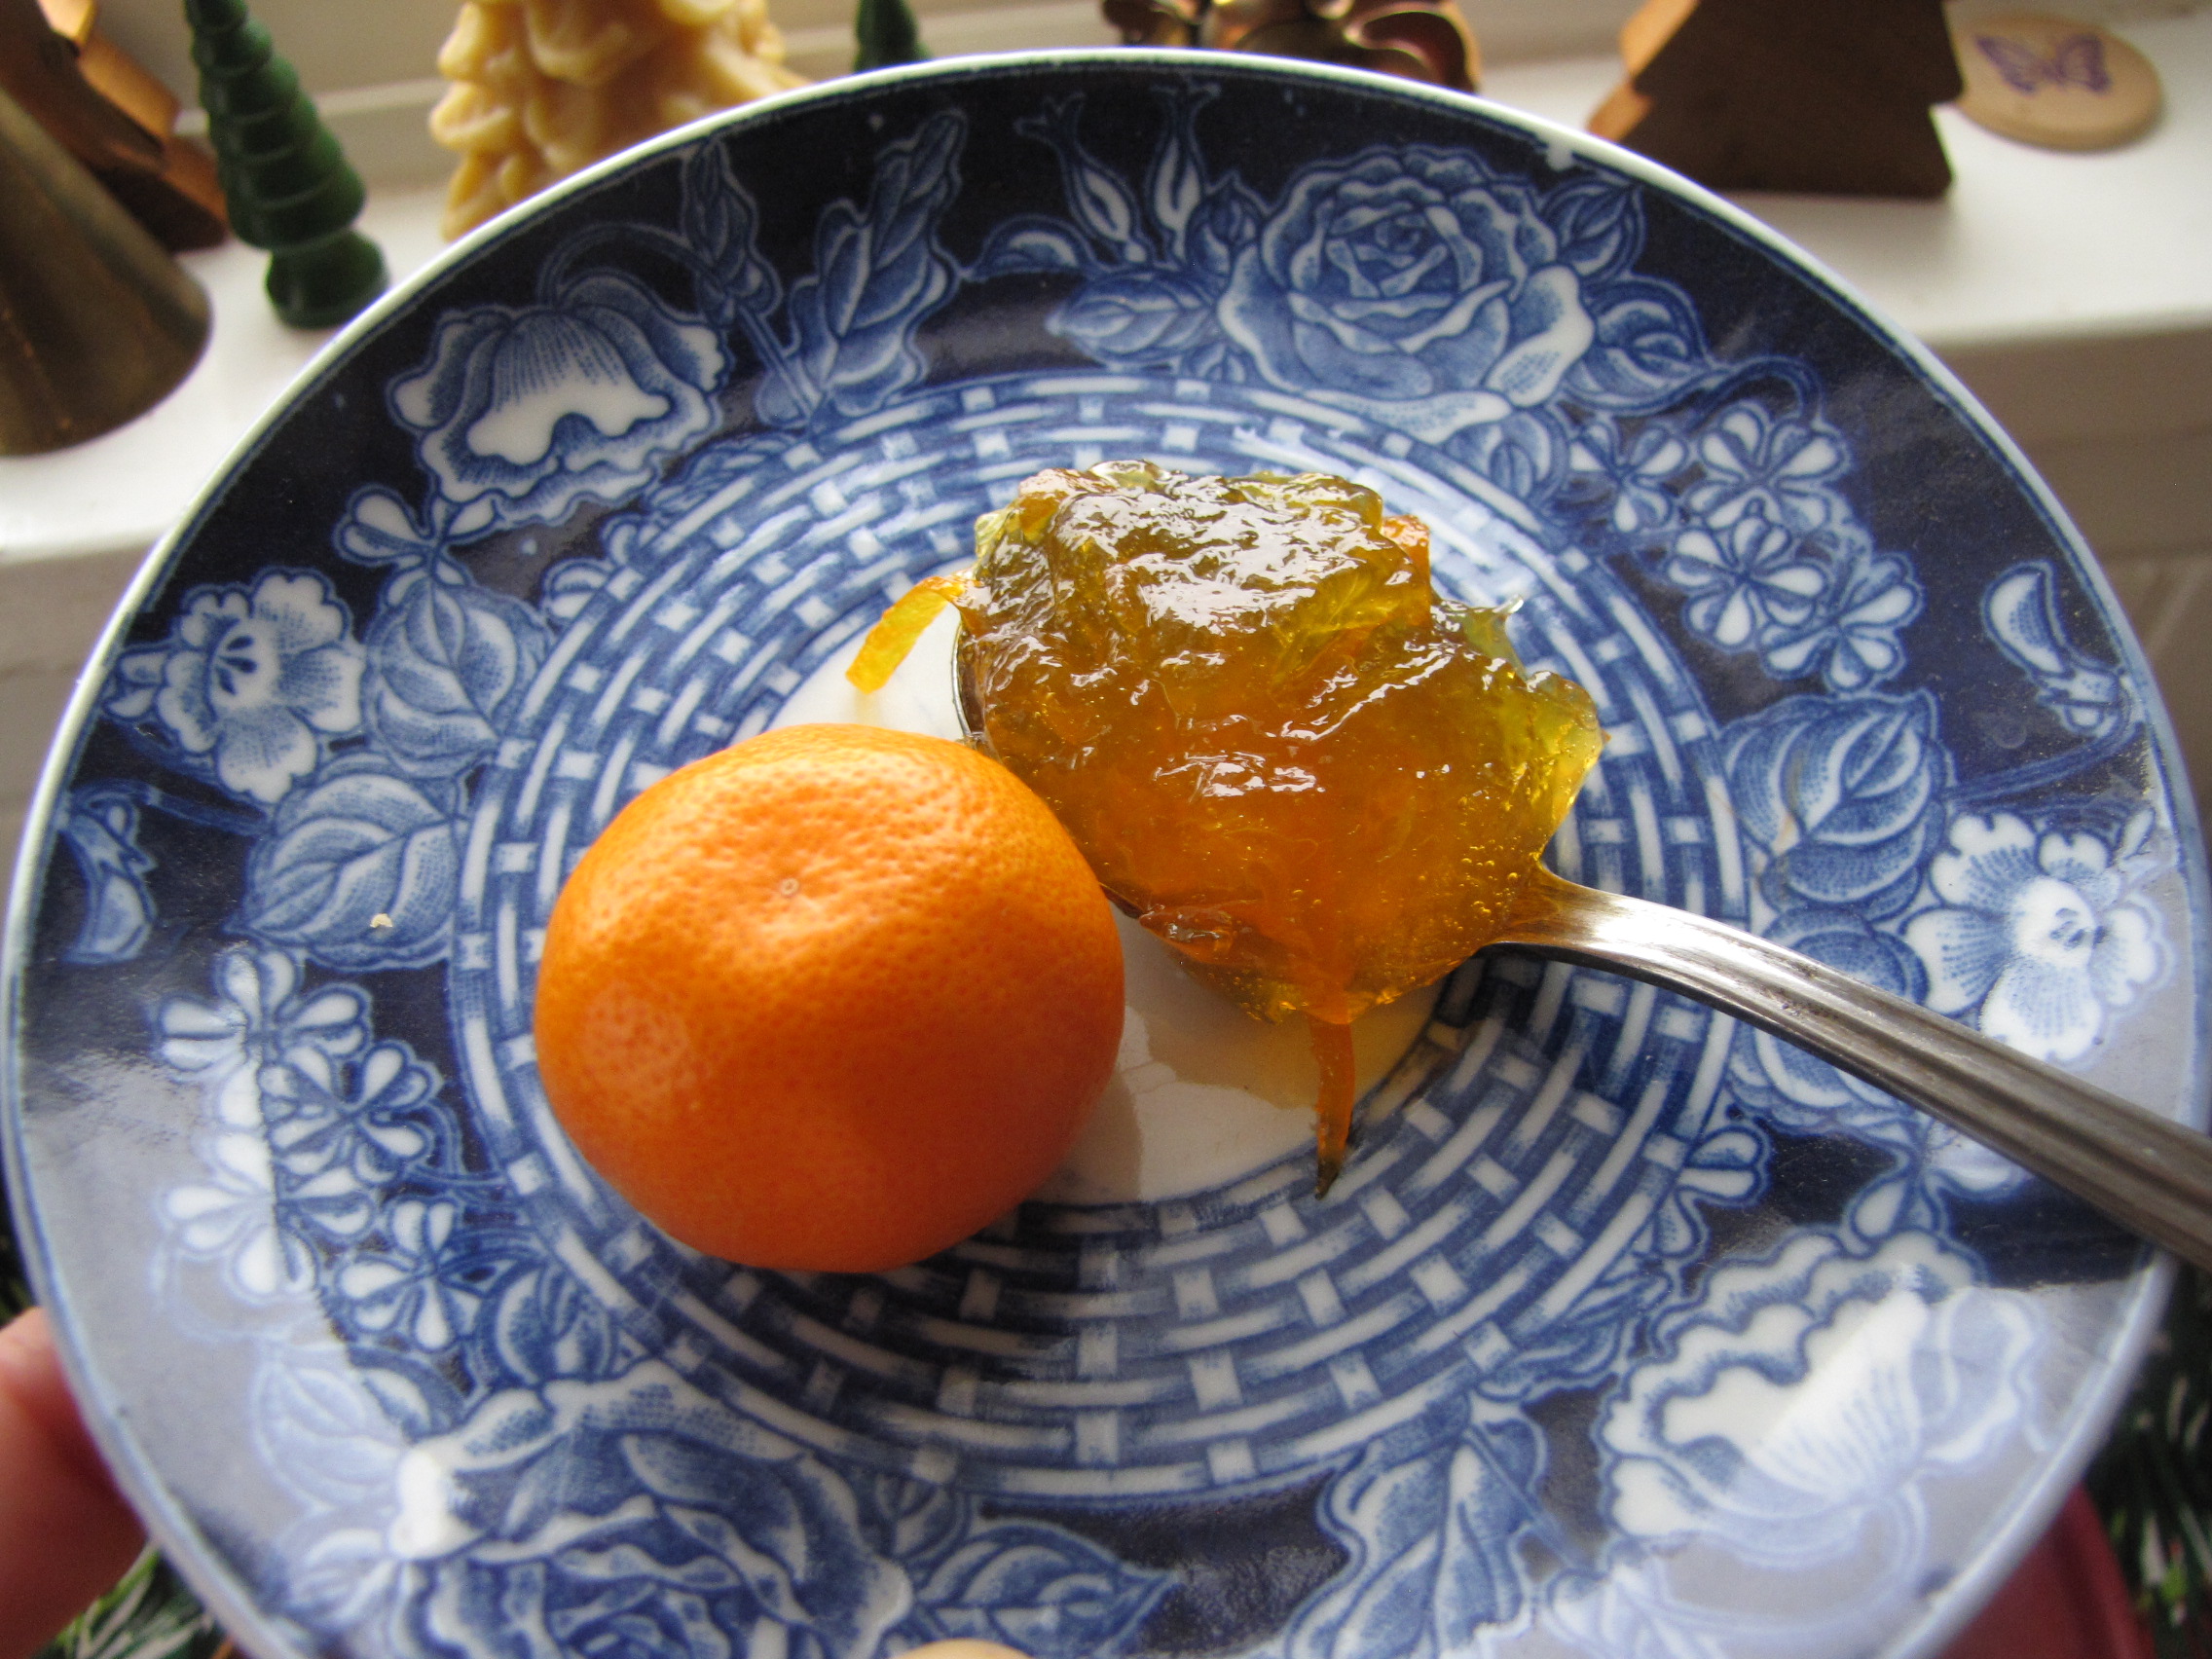
Now, take a little spoonful of each container and taste them.  Notice that Jar #1 is all alcohol, not very sweet, and as you progress through the jars, they will be more sugary, less alcoholic.  How sweet do you want the liqueur to be?  This is purely up to you – I always add all of jars 1 and 2 together, I add some of jar 3 and 4 little by little until I get the desired sweetness.  Any leftover alcoholic-fruit-syrup is enjoyed over ice cream (sometimes there’s as much as 1/2 cup left, and it’s very sugary).

Strain the liqueur through several layers of cheesecloth or a very clean flour-sack towel, put into small bottles, cork, label, and store in a dark place (so as not to fade the rich color).  Enjoy as a digestif or a bit drizzled into hot tea.  Use within 6 months.

Have you blogged about a favorite traditional homemade preserved food?  If so, please share the link with me, and I’ll add it to this post – I’d love to learn what other folks enjoy making.  Thanks!

Garden harvest

img_5670

Fridays are my days to volunteer at Penelope’s Garden.  This week’s harvest was 29 lbs delivered to Birch Community Services!!

img_5671

The raspberries are all done for the year, the mint bolted in the heat, but the tomatoes and green beans are in full production!  There were even some carrots and a new patch of basil ready.   (I must admit, I couldn’t help myself and snacked on some of the tender beans while harvesting – SO delicious!)

img_5675

img_5673

The heat wave, followed by the cool snap in the weather caused the Walla Walla sweet onions to bolt and then fall, so that meant harvest time for them, too.  They smelled unbelievably good.

Next week it looks like lots of peppers, some patty-pans, and maybe even some cucumbers will be added to the wave of tomatoes and green beans to bring in.  Can’t wait!

What are you harvesting in your garden this week?

(Don’t forget – check out my Contest, if you haven’t yet.  Thanks!)

Berry Pies

img_5385

Another family at church has welcomed  their first baby.   It’s our privilege to bring them dinner tonight (and ooh and ahh over their little boy), so the girls helped me bake some Blueberry-Raspberry- Marionberry pies to take for dessert (I love living in the Northwest!).

img_5383

Firecracker helped with the lattice top, and Little Hen shaped the edges (I love seeing a child’s hand in the process).

img_5382

We always make some extra dough so that the girls can make their own little hand pies, dusted with sanding sugar,  for a good morning snack.

img_5386

Some other yummy goodies with berries being made recently at Charming the Birds, and Imagine Childhood.

What’s your favorite summer berry recipe?

Baby things

img_5195

img_5198

My brother and his wife are getting ready to welcome their second child in the next few weeks, so of course, that meant another opportunity to knit some booties.  The pattern is one I have used many many times – Ruth’s Perfect, in Cascade 220.

To go along with the booties, a locally made walnut rattle we picked up at Milagros Boutique.   This rattle was so beautiful and made such a soft, sweet sound, I wanted one for myself!  Ah, well, maybe when we have our next baby…

img_5194

Just a few more weeks, and I’ll have a new niece or nephew!  Now, off to the box everything up and get to the post office!

Handwork Cushion

img_5150

A cushion handmade by my great-grandmother -  wool rug-hooking on black velvet, I believe.  My aunt found it in my grandmother’s house, and was set to throw it out (“it’s so kitschy, who would want it?”), but my mom immediately rescued it for me, knowing it would be right at home here .  I’m in love with colors, the birds, with having something of Ma-maw’s.